Wednesday, December 30, 2015

Experimenting with Setting the Inlay

To set the inlay into the headstock I was going to use a Dremel motortool and a 1/8 inch router bit. I copied the process described in this article

I decided to heed my wife's advice and do some tests on scrap wood. She figured that since I had so may logos I could spare one for the tests. I argued that if I used up one of the logos, I would only be able to build 14 guitars rather than 15. She was correct, of course. 

I lightly tacked the logo to a test board using Elmer's wood glue. The wood glue was water soluble but dried quickly. Once I was sure the logo would not move,  I traced the outline in pencil and removed the logo. 

I used a Dremel routing platform Dremel 335-01 Plunge Router with a Dremel 650 1/8 Straight Routing Bit, to make my cut.

The Dremel plunge router with the 1/8 bit.

Getting the proper cut depth turned out to be difficult. The inset was only 1.54 mm think and I wanted to make sure that the cut was slightly shallow. The adjustments on the plunge router were too coarse to easily get this kind of precision. After several attempts that ended up in cuts that were too shallow and too deep, I found the easiest way to adjust the depth was to leave the router locked in the down position and then loosen the chuck and move the bit. I could measure the depth by laying the logo next to the bit to see how it compared. After several tweaks, I found a depth that worked. The cut was more shallow than I wanted but it was close enough.

The first cut was a bit loose.
During the experiments I found that the pencil marking was too faint. I switched to a felt tip marker that left an obvious black line. I moved slowly to stay just inside the line. I would then test the logo for fit and widen the shape where needed.

A cut that was not too deep and only a little shallow.

In the reference article, the author used a 3/32 inch bit allowing for a more precise shape. Since I used a 1/8 inch bit, my shape was a little rough but my logo had a much more simple shape.

While test fitting the logo, the inlay broke at the weak spot in the U. This was not a concern as it was just a test, and since the inlay was going to be set in epoxy, the two pieces would only need careful placement.

Stewart-McDonald's black epoxy.
I mixed the black two-part epoxy from Stewart-McDonald and used a toothpick to apply it. The epoxy was very thick and took some coaxing to get into the spaces around the logo. After I thought I had all spaces filled I set it aside to cure. The instructions on the side of the bottle said the epoxy could be sanded in 72 hours. What? That's like three days!


The epoxy covered logo.

Saturday, December 12, 2015

Repaint!

While applying the copper foil I noticed that even though the guitar body had a nice shine, there were deep scratches covering the surface. They seemed to only be visible in high-contrast light. After some deliberation I decided that even though the scratches might not be visible in average lighting, I would not be happy with the finish until I did something about them.

My first attempt to resolve this was to resand the existing lacquer. I stared with 400 grit and sanded in only one direction, thinking it would eliminate the random scratches I was seeing. I switched to 600 grit and worked my way up to my 12000 grit polishing cloths. I then used the Meguiar's and the shine was back.
The middle of the re-sanding process.

It didn't work. I could still see scratches but at least they were all in the same direction!

Later, I brought this up with my father and he recommend using only rubbing compound to polish the lacquer. It looked like I was going the have do my own version of Ralph Macchio's Daniel. In any case, the guitar was going to need some fresh lacquer. I had removed so much with my previous efforts that I wanted to make sure I filled the scratches and had enough paint that I would not rub though when I re-polished.

Having just lined the pickup cavities with copper tape, I covered it with 3M blue tape to try to preserve it. I also masked off the sides and back as I was really only concerned about the front.

Masked and ready for clear coat.

I sprayed the Rust-Oleum as I had before. This time I could lay it on a bit thicker as I could have the guitar dry while lying flat on my bench. This would prevent any runs. After several coats applied over two days I hung the body to cure for a few weeks.

Several heavy coats of lacquer were applied and then the 
guitar body was hung up to dry. 

Tuesday, December 8, 2015

Copper Shielding - Part 1

The body was in good shape and I was too lazy to start on the neck. It would have been fun to start adding all the shiny chrome parts to the body but I thought that might backfire. It might be best to keep the body as it was until the neck ready to go. I decided to add the copper shielding to all the control cavities.


Copper shielding tape added to both pickup cavities.

I bought a ten-foot roll of copper tape from a seller on eBay. I cut strips of tape and began applying them to the inside of the pickup cavities. I used the eraser end of a pencil to burnish the tape into tight corners and around curves. The tape went on easily and conformed well to all the complex shapes.


Applied in strips, the tape conformed easily to the cavity shape.

I was applying the tape on my kitchen table and something about the lighting in the room really made imperfections in the finish stand out. There were a lot of scratches in the clear coat. The more I looked the more I saw. They were on all sides of the guitar. I assumed that this was an artifact of grit getting lodged in the sandpaper which cut gouges in the paint as I sanded. I tried to ignore the scratches as I continued applying the copper tape.

It was no use, I realized I would never really be happy with the finish even if the scratches were only visible in just the right light. I decided to re-polish the guitar. I stopped applying the copper tape since it would now need to be masked while I tried to fix the finish.

Monday, December 7, 2015

Inlays Arrive

The Slouchtone inlays arrived today. It seemed I had my work cut out for me. Adrian had managed to fit 15 on the sheet and it would be wrong of me to not use them all. They arrived reinserted into the holes in the plastic sheet from where they came. They were then held in place by a piece of tape. This was a smart way to secure them for shipping.


Fifteen inlays stored safely in the plastic sheet

The laser left yellow staining


The logos were much more dainty than I had imagined when looking at the printed artwork. Some of the out-strokes connecting the letters were dangerously thin. They would require careful handling. In the future when I started my sixteenth guitar I would have to design a more sturdy logo before sending it off to Adrian and the Guitarlogo-Inator.


Some careful brushing cleaned off much of the staining.
Note the fragile joints between the letters


The inlays had a smokey yellow tint around the edges, as if they had been scorched by some sort of electromagnetic radiation. I carefully cleaned an inlay with a toothbrush (don't tell my wife), and much of the yellow staining came off. I figured that since the logo would be buried in black epoxy and then sanded flat on its face the discoloration would not be a problem.

Sunday, November 15, 2015

Logo Inlay

I wanted to have an inlayed logo to add to the headstock. I was not quite clear how I would make an inlay but I knew the starting point was to come up with a design. I had given some thought to a brand name, and after much consideration, and given my playing abilities, the only fitting choice was Slouchtone.

I goofed around in Adobe Illustrator trying to imitate the Gibson and Epiphone logos but nothing really gelled. I found an automotive-style font called Magneto which seemed a good starting point. I made some minor modifications to the letters and gave the logo a slight arch (slouch - get it?) – close enough!

The Slouchtone artwork

I intended to carve the inlay out of a sheet of 1.5mm white pearloid plastic I had bought off eBay sometime before. After I determined the size of the logo should be about 2.25 inches I sized the artwork in Illustrator and printed it out. I glued the printed logo to the plastic and let it dry.

The printed logo laminated on to the plastic

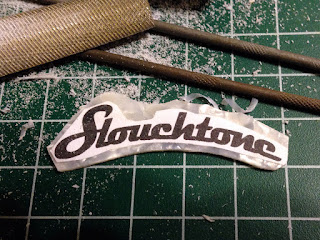
Once dry, I started to carve out the logo. Using side-cutters, a razor saw, an X-acto knife, and several small files I made slow progress. After a couple hours work I had removed enough material to have only the most basic shape of the logo. This was the easy part! I would next need to cut out all those negative spaces inside and between the letters. 

Slow progress timing the plastic

Test fitting the logo on the headstock

After a lot of carving, only the basic outline
of the logo had been achieved

About this time I sent an image of my progress to my friend Roy. He replied, "why don't you laser-cut it?" Sure, I thought. I'll just give my friend Heinz Doofenshmirtz a call. He can fire up his Guitarlogo-Inator and then I'll be all set. Roy had a slightly better idea. He set me up with his friend Adrian who was not only an actual human, but also had unfettered access to a laser cutter without a chance of being thwarted by a platypus.

A few emails later, I was sending the vector artwork for the logo and the percoid plastic sheet off to Adrian. 

Saturday, November 14, 2015

Polishing

I waited about a month for the lacquer to cure. It seemed that the run on the side of the guitar had taken care of itself. I found only the slightest trace of it after the paint had fully hardened. 

To start the polishing process I wet sanded with 400 grit sandpaper. I needed to get the bumpy orange peel surface smooth before I moved on to finer grit sandpaper. I sanded from the center toward the edge, and never over the edge. Sanding over the edges and corners would cause the sandpaper to remove too much clear coat and possibly rub through the paint.

The body after curing for a month

The back of the guitar before polishing

It was important to make sure the sandpaper did not get loaded up with paint particles. This could cause the paper to be less effective but also scratch the surface if larger pieces of grit got lodged between the guitar and the paper. I would frequently dip the paper in water and wipe it off on a towel, then rewet the paper before sanding.

Wet sanding using 400 grit

After a fair amount of sanding I used a damp cloth to wipe off the slurry from the sanding to see if there were any shiny spots on the paint. If there were I would continue sanding.

The glossy spots meant more sanding needed to be done.

Something unexpected were bubble holes in the paint in the cutaway. It seemed that the thick coats of paint I had put on at the end of the painting process might have attached the earlier coats. Somehow bubbles had formed and drilled all the way through the clear coat. I would not be able to polish these out. 

The bubbles in the cutaway ate down to the wood.

After the paint was leveled with the 400 grit, I moved on the finer grits. I used 600 and 800 wet and dry sandpaper, and then used 1600, 2400, 3200, and 12,000 grit sanding cloths. Every time I used a sanding block and lots of water.

After using the 12,000 grit cloth, I could see a hint of a shine but the guitar was still nowhere near glossy. To achieve the high-gloss I used Meguiar's Deep Gloss polish. I'm not sure if this was a pure rubbing compound without wax, but it was what I had at the time.

Wiping off the Meguiar's polish

I used a clean, damp shop rag to apply the Meguiar's. I then wiped it off with the clean dry cloth. The shine was dramatic. I applied a couple more coats of the polish and the body looked pretty good.

The high-gloss shine after using the car polish

I found a spot on the cutout horn where I had rubbed through. It either did not get enough lacquer, or received too much pressure when sanding. After I completed polishing, I carefully repainted this area and filled the bubbles in the cut out by using a small brush. The touch-ups would have to cure before I polished them.

Sunday, October 4, 2015

Carving the Headstock

While the lacquer on the guitar was curing I got to work on the the neck. The first thing I needed to do was reshape the headstock. The kit part was flat across the top but I wanted it to have the same shape as the Gibson.

I found a drawing of a Gibson headstock online. The geometry of the drawing was different than that of the kit part but I only cared about the width of the curve at the top. I resized the image in Photoshop to be slightly wider than the kit headstock. I printed the drawing and glued it to a thin piece of scrap wood. This was to be used as the jig to guide the router during the cut. The jig would hit the collar around the router bit allowing the bit to only cut the wood up to the jig.

The printout laminated to a thin board

Using a band saw I cut out the shape as close as I could. The humps at the top of the curve were not quite symmetric but it was close enough.

The jig after cutting on the bandsaw

To use the hand router like a table router, I turned the router upside down so the router bit was pointing up. This way I could move the small piece of wood against the bit. To keep the router from bouncing all over the bench, my father held it down while I moved the jig.

After clamping the jig to a piece of scrap wood, I did a test cut. The test worked so I attached the jig to the headstock. Since there were to be no do-overs I triple-checked the positioning of the jig and crammed it into the router. The system worked for a second time, but since I was cutting end grain the results were a bit more rough than my initial test.

The test cut

The initial cut to the headstock. Note the lovely glue spot.

Also, since the blade was spinning clockwise into the wood, there was some splintering on the left most side of the cut. What I should have done was stop cutting when I got to the middle, flip the jig over to the other side of the headstock and cut the other half. This way the router bit would have always been spinning toward the center of the headstock.

The rough edges in the end grain

The router bit was too fat to fit into the pointiest part of the V in the center of the jig. I cleaned this up with files.

The final shape after filing and reshaping

While irritating, the splintering was not too bad. I glued and clamped the cracked bits back into place. Later I piled on the wood putty to fill the ragged end grain.

The damage glued and puttied

Tuesday, September 22, 2015

Yet More Clear Coat

After waiting a day for the lacquer to harden, I lightly sanded the guitar with my small sanding block and 400 grit paper. This was just to knock the peaks off the paint and make it more level for the next round of paint. When this was done I wiped the guitar down and sprayed several more coats throughout the day.

The guitar after the first coat of lacquer

The back of the guitar showing how the handle was attached

Light sanding between coat

I repeated this process for four days. I wanted to get as much lacquer on the body as possible so I would not rub through the paint during polishing.

On the last day I was getting a little brave and laid the paint on a little thick. This caused a run near the cord jack cavity.

The paint run

Now that the guitar was covered in nearly three entire cans of lacquer, it was time to hang it up and forget about it for a month. After that time I could begin dealing with the run and start the polishing.

The guitar was hung to fully cure

Monday, September 21, 2015

Clear Coat

I did some minor touch-up to the paint job before applying my clear lacquer. There were areas on the front of the guitar that were blemished or where sloppy masking showed wood around the binding. I used a 000 brush and some green model paint to touch up these areas. It was not an exact match but close enough.

Model paint used for touch-up
A small brush was used to apply the paint

I knew I would be applying a lot of paint over the whole body. Rather than be forced to take long pauses while my air compressor recharged, I decided to use spay cans. I'm sure the Behlen Stringed Instrument Lacquer was really nice but it was $13.00. I chose to use Rust-Oleum Specialty clear lacquer for less than $4.00 per can. Not only was it substantially cheaper, it was readily available.

I quickly found that holding the trigger down on a spray can would make my finger tired. I added a spray grip to the can. This was a pistol grip with a trigger that fastened to the top of the spray can and made the can much more comfortable to hold. It got my finger tip away from the nozzle and gave me better control of the spray.

The spray grip attached to the can

I sprayed several light coats and then hung the guitar to dry for about an hour. I repeated this process a couple more times and let the guitar dry over night. 

The guitar dried overnight with the laundry


Sunday, September 13, 2015

Choosing a Stain

The front of the guitar was to be seafoam, or in my case, green. All the other surfaces were to be stained - or maybe not. It was possible that merely applying lacquer would darken the wood enough to be close to the color of the Gibson.

I found a piece of mahogany scrap lumber that was close to the same color as the mahogany used in the guitar kit. On this I brushed a few coats of lacquer. The color of the wood looked close to the results I wanted. I knew better than to trust that the wood on the guitar would behave the same way. I used a small brush to paint part of the inside of the control bay. This did not darken the wood like it had on the scrap lumber.

Testing the lacquer.

I pillaged my father's stain collection and sampled several on un-lacquered areas of the control bay. Like trying to conjure up just the right seafoam dye mix, this was a bit of a crap shoot. Just because the stain in the can was a good match, I had to actually put it on the wood to see the final result. The winner was ZAR Fruitwood.

Stain tests in the control bay

This seemed like a good match

I masked the binding and trusted myself to keep it off all the green parts. I applied two coats to the back and sides to ensure even coverage. The result was a little darker than I had expected from the test. Still, it looked pretty good. It was nice to get a glimpse of how the body would look when finished.

Masking the binding

The stained body

As before, there was some bleeding of the stain onto the binding. This was just as easy to clean up. I taped the same razor blade into the cardboard and scraped all around the guitar.

Scraping the binding

After a few days of drying, I would be able to start spraying the clear coat.

A glimpse at the finished finish 

Saturday, September 12, 2015

Paint Cleanup

The 3M green tape on the binding was good, but not perfect. Or maybe the tape was perfect but I did not mask well. In either case there was paint bleeding in some areas. Cleanup was easy. It might have been the first task in the project that had gone as planned.

I folded a piece of cardboard around a razor blade so the blade stuck out to the width of the binding. I then taped the blade in place. Using the cardboard as a guide, I scraped the blade along the binding. This worked perfectly. I moved the blade around the guitar until all the errant paint was removed.

A razor blade was used to clean the binding.

The 3M tape did its job but it did leave some residue. I used denatured alcohol and quite a bit of elbow grease to remove it.

Tape goop left after masking.

Lastly, some of the debris in the paint was not removed with the sandpaper I used previously. I used an X-acto blade to scrape these off.

Debris being removed with a knife blade.